Guide
This document is a simplified version of AlibabaCloud official documentation, combined with the actual operation of the deployment, to help you quickly master The most basic skills.
ECS
You can change the manage ECS from Alibaba Cloud console:
Create ECS
-
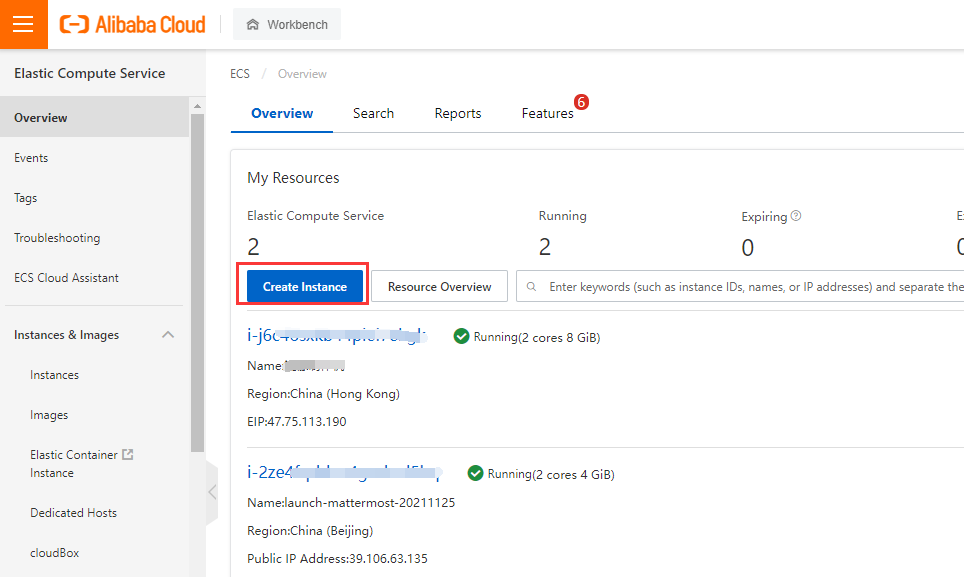
Login to Console, open:【Elastic Compute Service】>【Instances】>【Create Instance】
-
Select the payment method, instance type like these
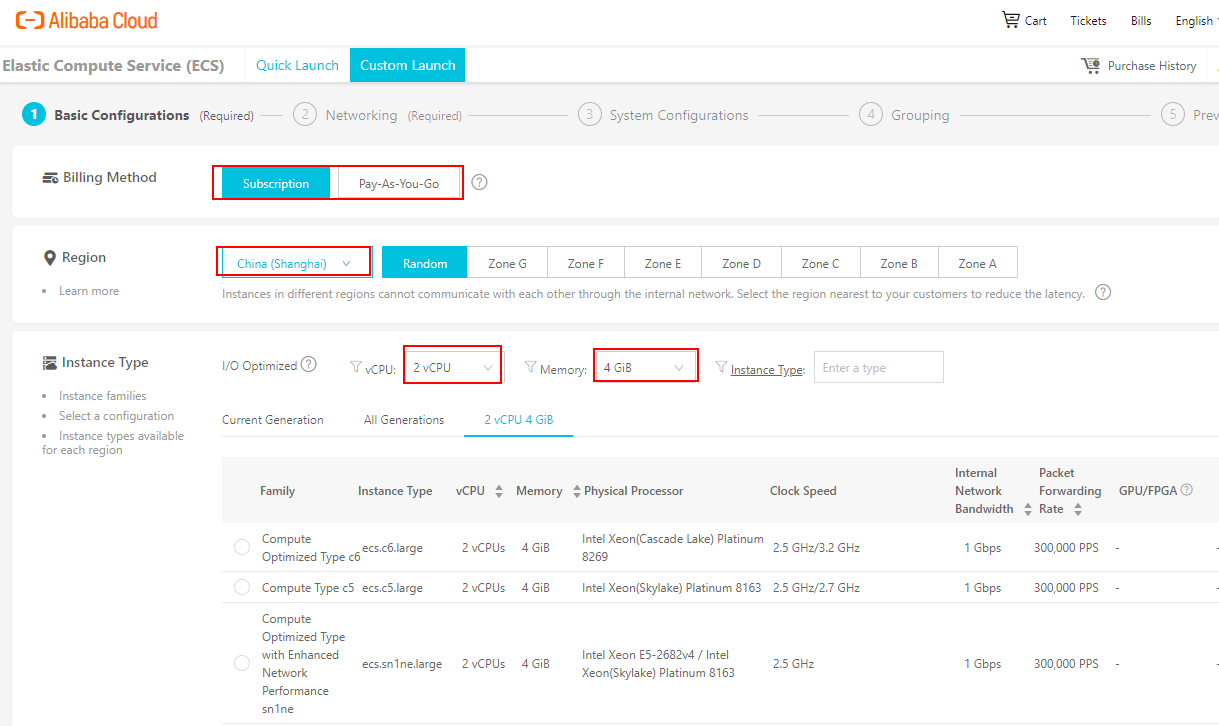
- Subscription: Allows you to pay upfront and then use the service over a period of time.
- Pay-As-You-Go: A billing method based on the amount of resources you actually use.
- Preemptive Instance: A billing method based on the amount of resources you actually use.
-
Select the Image step is very important
- Public Image: Alibaba Cloud provides official public images.
- Custom Image: Created from system snapshots of yourself
- Shared Image: Other user shared for you
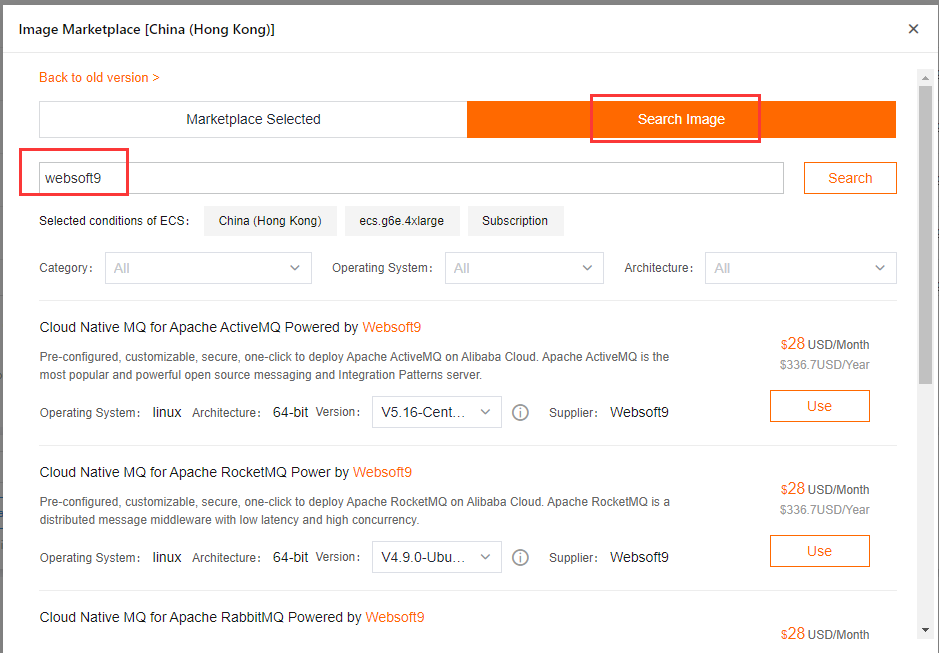
- Marketplace Image: Alibaba Cloud Marketplace provides hundreds of high-quality third-party images that have undergone a strict review process.
-
If you use the Marketplace Image, suggest use the search key "websoft9"
-
Select the image you want to use
-
Go to next steps, include set Networking, System Configurations and so on
-
Wait 2-3 minutes for the ECS running when completed these steps
Create Key Pairs
You should create Key Pairs before create ECS if you want to use Key Pairs for ECS connection
-
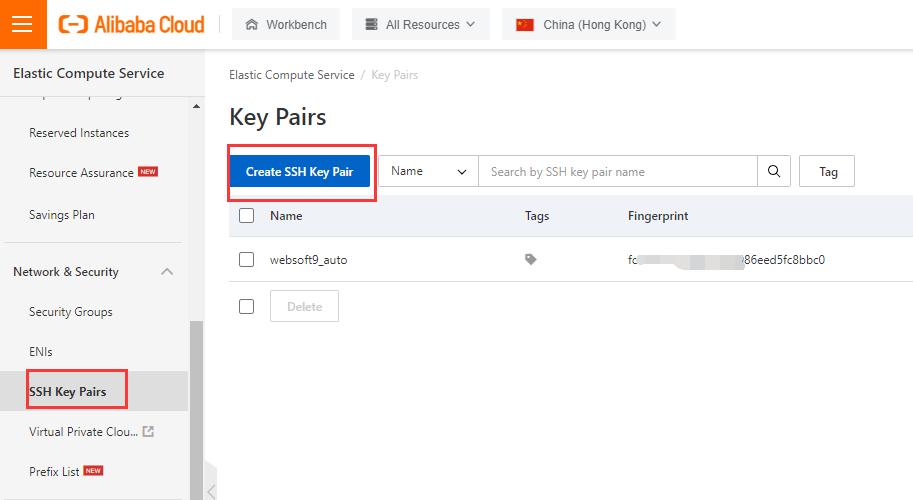
Login to Console, open:【Elastic Compute Service】>【Network and Security】>【Create Key Pairs】
-
Set the SSH Key Pair Name and select Creation Mode
-
When you complete the creation, please download the ××××.pem to your local computer
Connect ECS
Blow are the methods for you to connect ECS of Alibaba Cloud:
| Methods | Details |
|---|---|
| Local SSH Connection | Install Putty to your local computer and run it |
| Workbench Connection | An online web-based tool of AlibabaCloud |
| VNC Connection | VNC online web-based tool of AlibabaCloud, you can use it when you can not run Putty or Workbench |
| Send Remote Commands (Cloud Assistant) | To send remote commands, you must use the task execution feature provided by Cloud Assistant |
We use Workbench Connection to show you how to connect Linux:
-
Login to Console and list all you ECS, then click 【Connect】action for your target ECS

-
Then, click the 【Send Remote Call】button of 【Send Remote Commands (Cloud Assistant)】
-
Waiting for loading, and input username and password or Key Pairs to connect it
Reset password
You can reset the ECS's password by the flowing method:
Reset by Console
-
Login to AlibabaCloud console, list the ECS
-
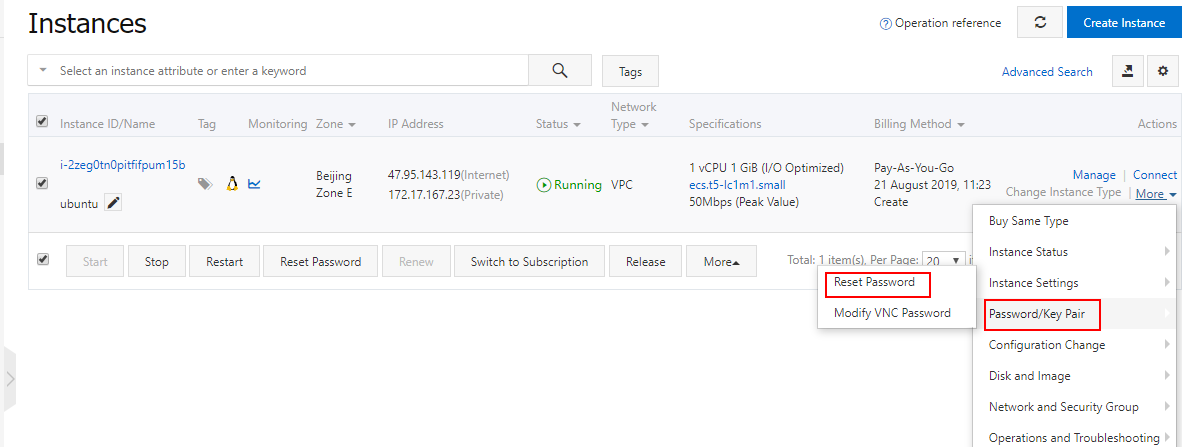
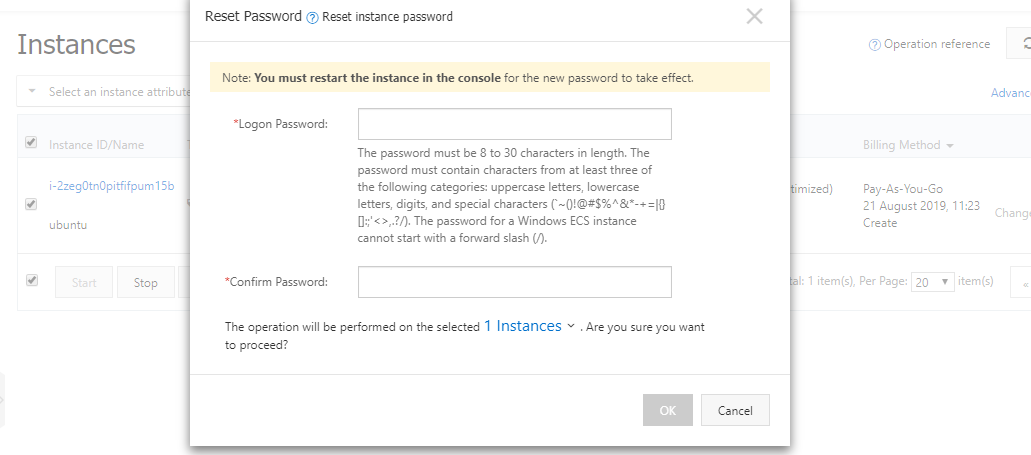
Open the menu:【Password/Key Pair】>【Reset Password】
-
Restart the ECS and it take effect
Reset by Command
-
Login to AlibabaCloud console, list the ECS
-
Open the menu:【Connect】>【Send remote call】
-
Input your command like below click 【Run】 button
echo "yourpassword" | passwd --stdin root -
You can receive below message when running successfully
Changing password for user root.
passwd: all authentication tokens updated successfully.
Upgrade/Downgrade
If you want to change the ECS configuration for business, you should Upgrade or Downgrade it
-
Login to AlibabaCloud console, list the ECS
-
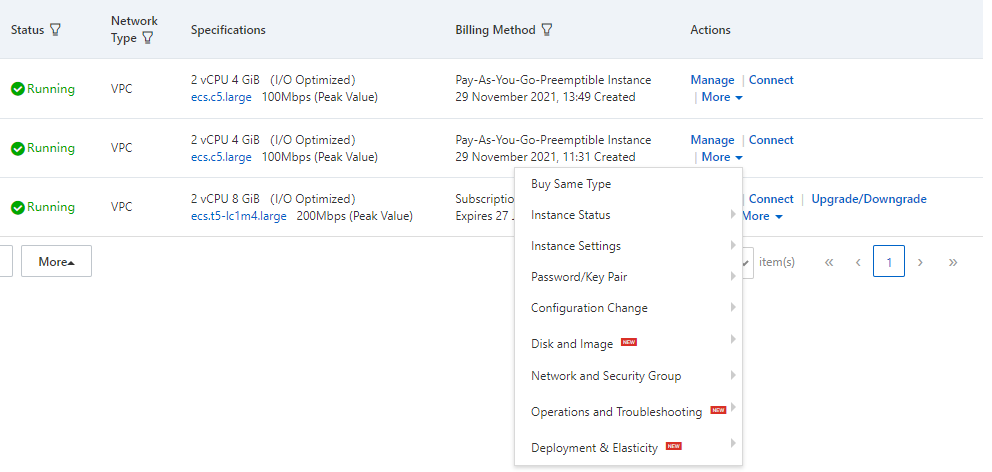
Open the 【Upgrade/Downgrade】menu of the target ECS
-
You can choose from the following upgrade or downgrade schemes
Reinitialize ECS
If you want to recover to ECS to the state of first installation, you need 【Reinitialize Disk】operation:
-
Login to AlibabaCloud console, list the ECS
-
Stop your the target ECS
-
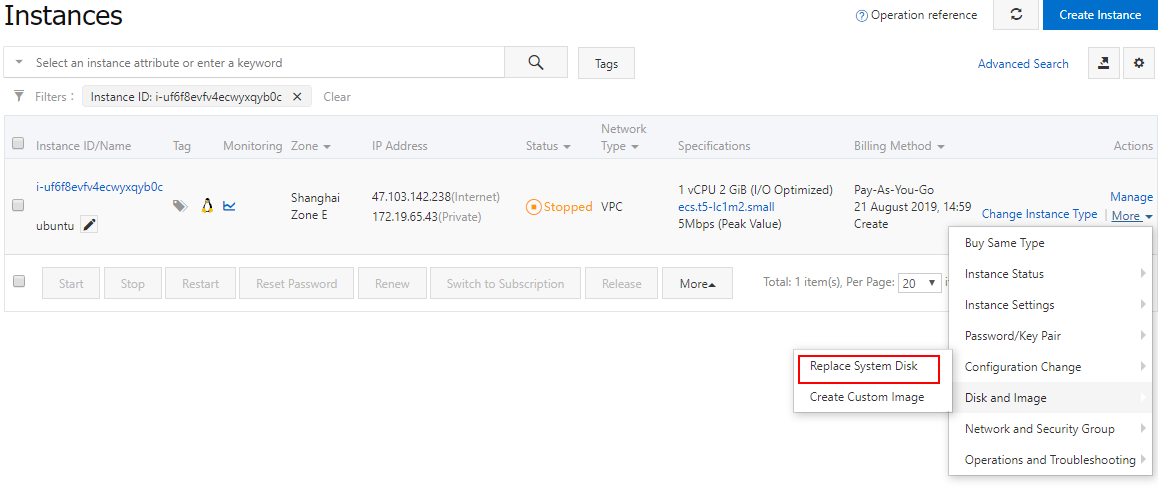
Open the menu: 【More】>【Disk and Image】>【Reinitialize Disk】
-
Go to the next steps
Could you distinguish Reinitialize Disk and Replace System Disk?
Backup
The best backup method is automatic backup, you can use the Snapshot function of AlibabaCloud to backup your Disk automatically.
You can backup your disk by the below methods:
Set automatic Snapshot
-
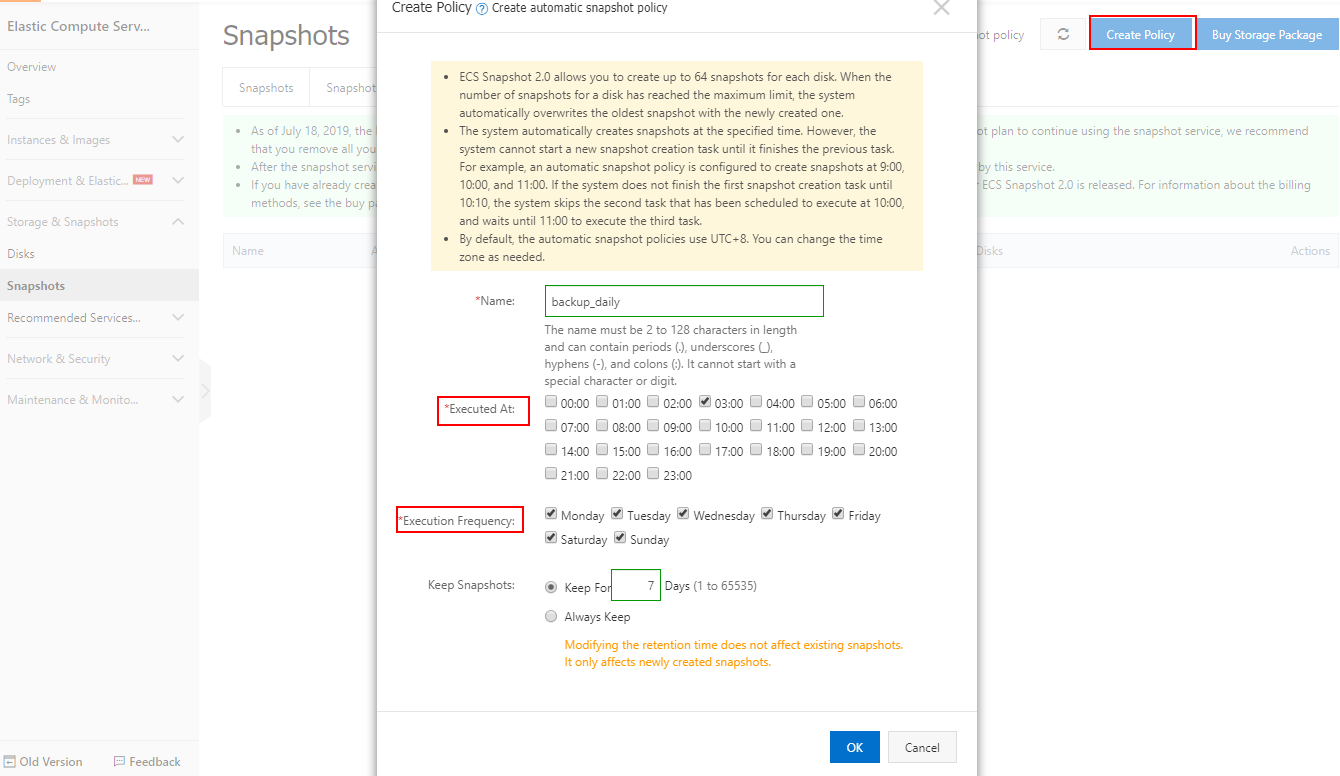
Login to Console, open:【Elastic Compute Service】>【Storage & Snapshots】>【Snapshots】
-
Click the 【Automatic Snapshot Policies】to list and create a policy for you
-
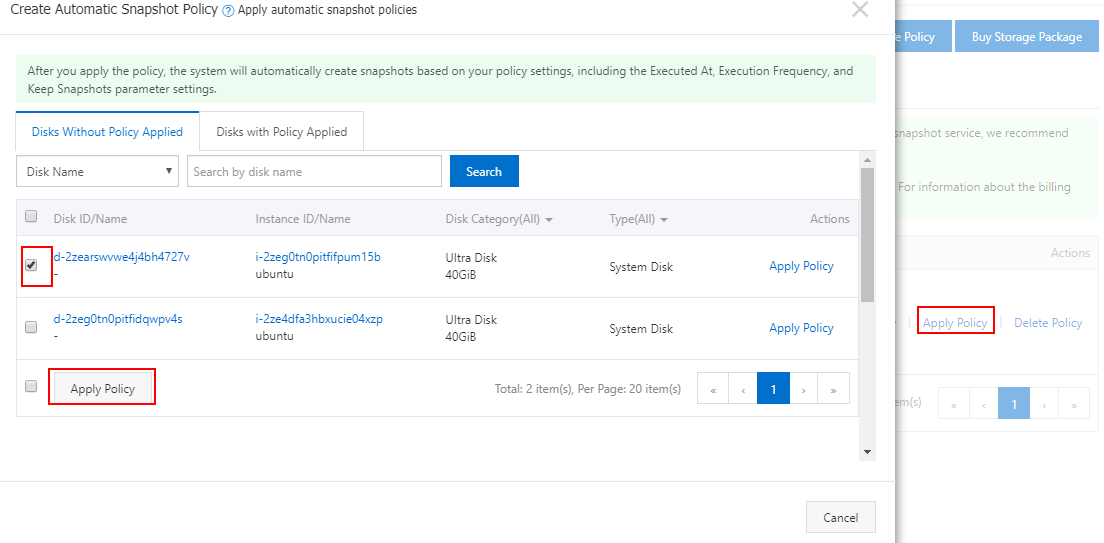
Apply or Disable Automatic Snapshot Policy for your disk
-
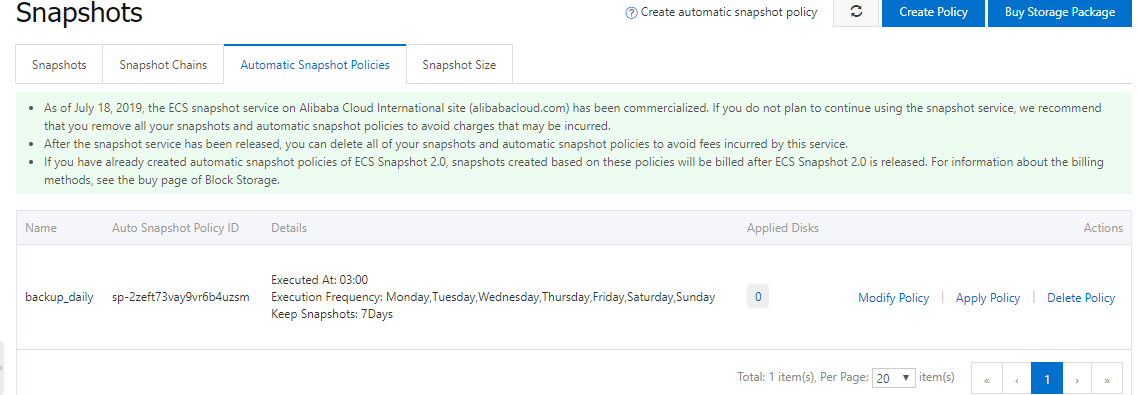
Then you can see that you disk have set snapshot successfully
Create Custom Image
If you don't want to set Snapshot, you can create a custom image for your ECS
-
Login to Console and list all ECS
-
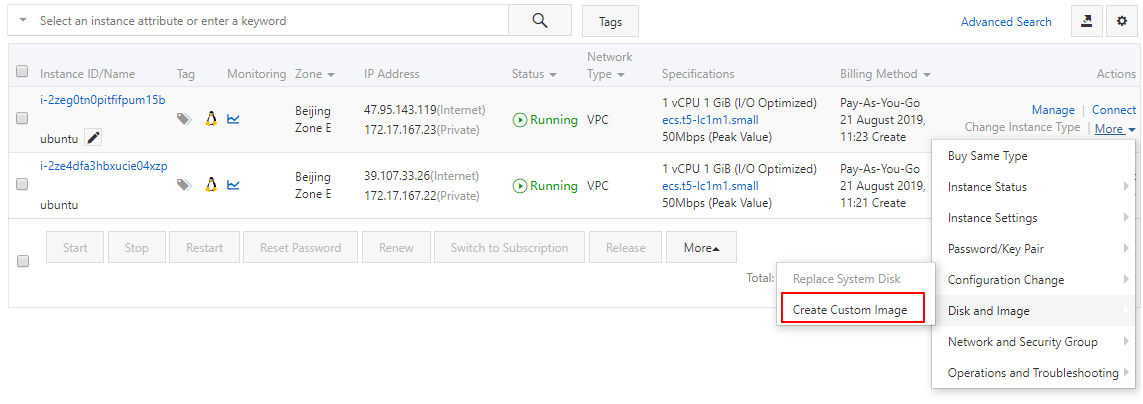
Open the menu 【Disk and Image】>【Create Custom Image】 for your target ECS
-
Go to the next steps
Disk, Snapshot and Image
Create Snapshot
-
Login to AlibabaCloud console, lis all disk by 【Elastic Compute Service】>【Disk】
-
Click the【Create Snapshot】 button to start it

-
Go to the next steps to complete it
Create Image
Image can be created based on snapshots, and image can be created based on ECS.
By ECS
-
Login to AlibabaCloud console, lis all ECS by 【Elastic Compute Service】>【Instances】
-
Click the menu 【Disk and Image】>【Create Custom Image】

-
Go to the next steps to complete it
By Snapshot
-
Login to AlibabaCloud console, lis all disk by 【Elastic Compute Service】>【Storage & Snapshots】>【Snapshots】
-
Select your Snapshot and create an Image for it

-
Go to the next steps to complete it
By local image
You can also create Image by OSS file which is your uploaded your local image
-
Login to AlibabaCloud console, lis all ECS by 【Elastic Compute Service】>【Instances and Images】>【Images】
-
Then click the Import Image link to create image by OSS file

-
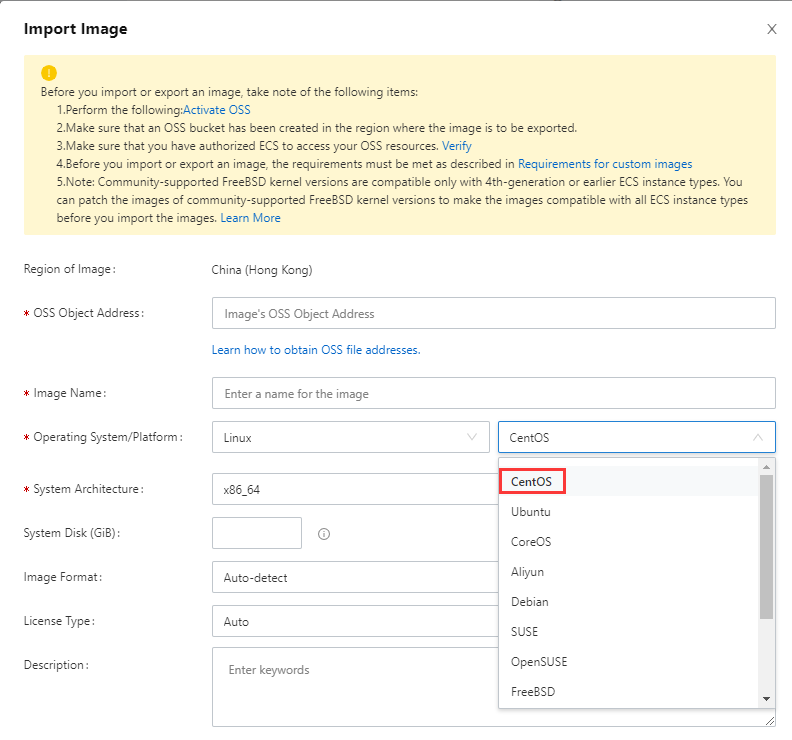
Set the parameters and you must select the correct Operating System/Platform for you image
What the difference between 【Others Linux】 and 【Customized Linux】? refer to here
Create Cloud disks
-
Login to Console to list all disk by 【Elastic Compute Service】>【Storage & Snapshot】>【Disk】
-
Click the 【Create Disk】 button

-
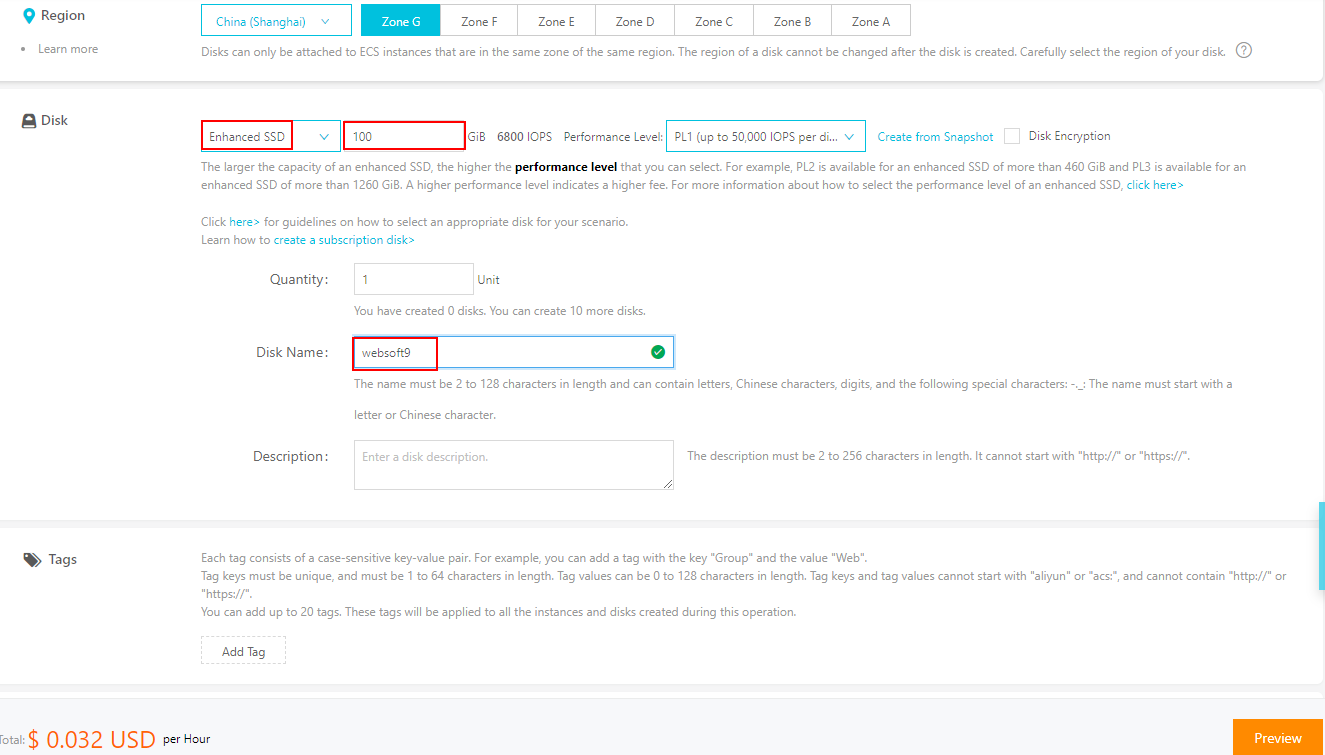
Set the Storage and Disk Name
-
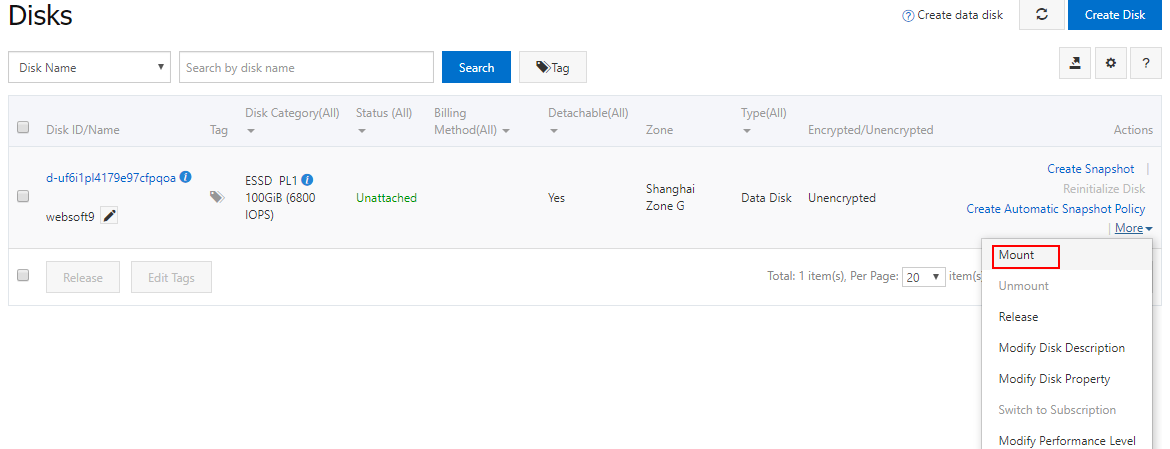
Attach your disk to target ECS
-
Then create partitions and file systems after the disk is attached to the instance
Detach Cloud disks
-
Login to Console to list all disk by 【Elastic Compute Service】>【Storage & Snapshot】>【Disk】
-
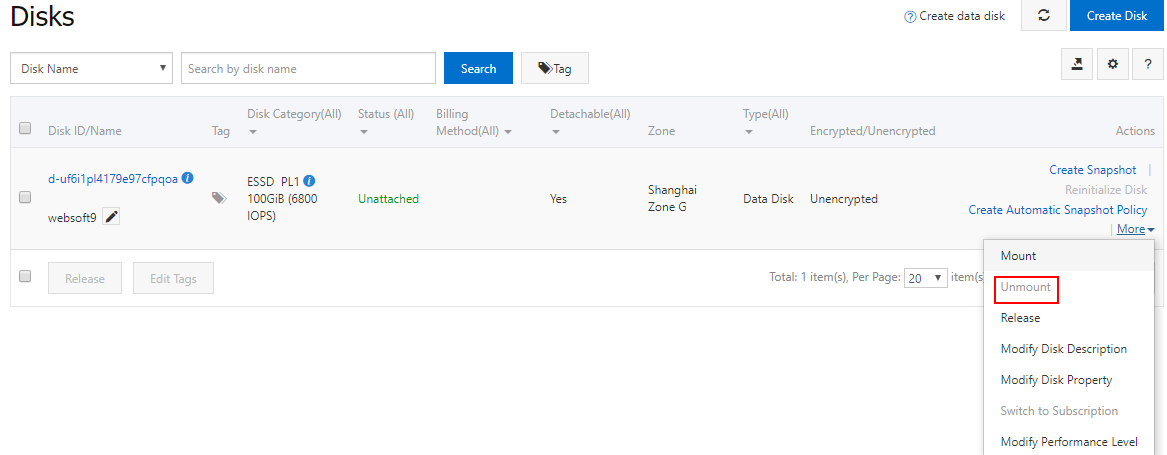
Click the 【More】>【Detach】
-
Go to the next steps
Resize Disks
You can resize your System Disk and Data Disk online by console
Resize most of time mean increase disk storage
-
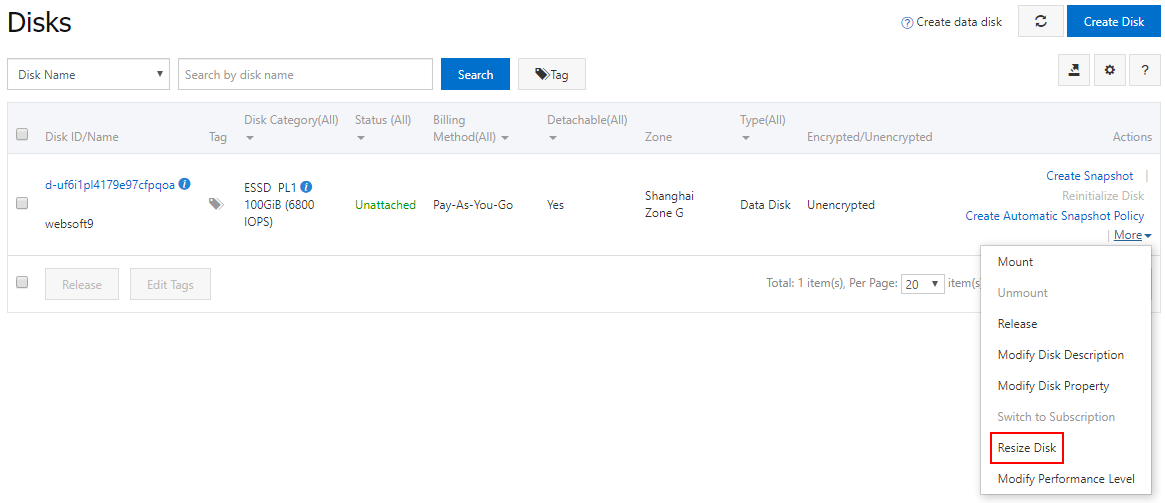
Login to Console to list all disk by 【Elastic Compute Service】>【Storage & Snapshot】>【Disk】
-
Click the 【More】>【Resize Disk】
-
Check option【Online Resizing】
-
Waiting for the result
Mount Disks
If you run df -m to list all file system and found that there not increase disk storage, how to resolve it?
-
Connect ECS and install
growpartfor ityum install -y cloud-utils-growpart
growpart /dev/vda 1 -
Add the new added disk to the first partition
# Attach to the first partition of first disk (System Disk)
growpart /dev/vda 1

# Attach to the first partition of second disk (Data Disk)
growpart /dev/vdb 1 -
Run the file system command
# ext
resize2fs /dev/vda1

# xfs
xfs_growfs /dev/vda1
Network and Security
Check IP
-
Login to console, lis all ECS by 【Elastic Compute Service】>【Instances and Images】>【Instances】
-
You can get the Public IP from the list table directly

Change IP
You can also change the Public IP for your ECS
-
Login to console, lis all ECS by 【Elastic Compute Service】>【Instances and Images】>【Instances】
-
Stop the ECS which you want to change IP for it
-
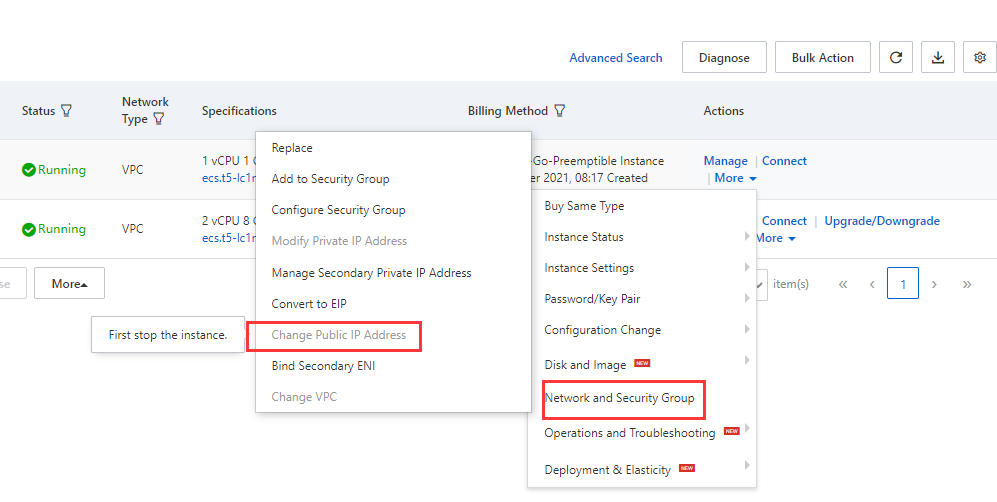
Open the menu: 【More】> 【Network and Security Group】>【Change Public IP Address】
-
Go to the next steps to complete it
Security Group
A security group acts as a virtual firewall for Elastic Compute Service (ECS) instances to control inbound and outbound traffic and improve security. You can use security groups and security group rules to define security domains in the cloud.
Below is a sample for you how to Enable TCP:80 port on security group:
-
Login to console, lis all ECS by 【Elastic Compute Service】>【Instances and Images】>【Instances】
-
Open the menu: 【More】> 【Network and Security Group】>【Configure Security Group】

-
Click the 【Add Rules】button to list all rules
-
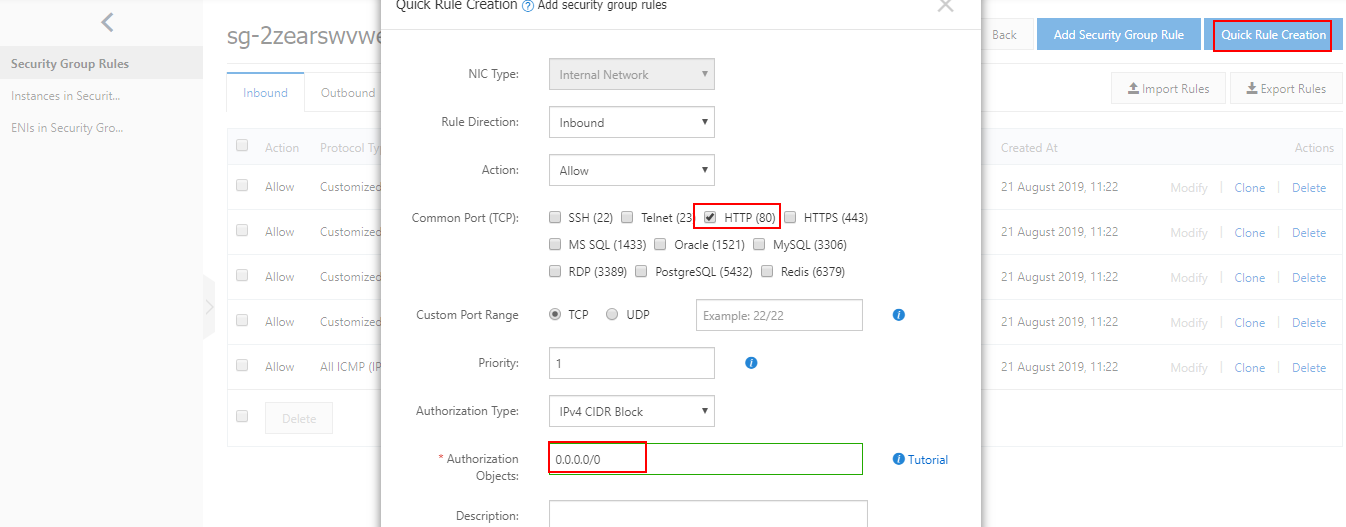
Then, add a new rule by click the 【Add Rule】button授权对象一般为较为合适
- Destination set to HTTP(80)
- Source set to 0.0.0.0/0
-
Save it
Domain Name
Domains is a domain name management platform that provides domain name registration, transaction, monitoring, and protection services.
Below steps is need for you to enable domains visit of your application:
Resolve Domain
Resolve Domain mean that you set a mapping relations between domain and ECS's IP
-
Buy your Domain and register it
-
Login to console, lis all domains by 【AlibabaCloud DNS】

-
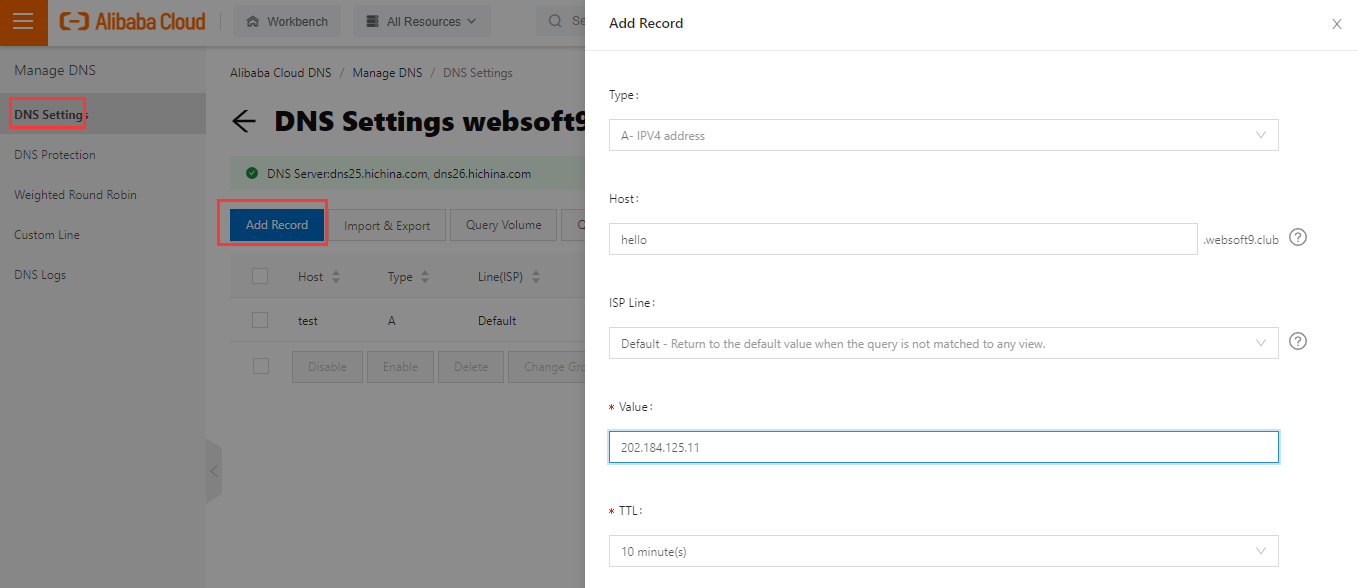
Add an Add Record for it
-
Save it and wait for 2-10 minute, then your DNS is take effect
Domain Beian
If you ECS is created in China, and you want to use Domain for application, you must complete the Domain Beian for Government governance.
Refer to: Domain Beian